Thursday, May 7, 2015

Women's Bundle Up Blog Tour: Jillian and Clemence

Have you seen enough BundleUp awesomeness yet?? No, of course not!


Seriously though, this bundle has been one of my all time favorites... so here I am to show you a little more of the bundle up on me.

Here I am wearing my Jillian Top from Greenstyle Creations and my Clemence shorts from Filles a Maman.


Let's start with the details.  First the Jillian.
Sizes: XXS to 3XL (bust 32" - 47")
wrap style racer back outer tank can be made in knit or woven
Inner tank, can be done as a tank, sports bra, or bandeau and is made from knit
REALLY fast to sew, and not a big fabric hog at all

And the Clemence:
Sizes: 00 to 24 (hips 33.25" - 52")
Short or Bermuda length
3 different style accents: 2 scallops and 1 flap
Made for wovens, and look really nice in a stretch woven. 


How am I doing at not looking awkward?  Justin is out of town so I hired Inara to take pictures for me.  She's not a half bad photographer for being 6.  She tells me that I'm "super weird" in front of the camera, though lol.  

I'd say that the sewing time on the Jillian was probably about 90 minutes for both pieces.  I did the bandeau for my inner tank, using a plain black cotton/spandex performance knit.  For the outer... This is exciting for me... I dyed my own fabric!!  The print is a custom knit from The Fabric Igloo, but because I never remember to order pre-orders when I want them, I actually got it from the host's Hyena Cart (Knits & Giggles).  I ordered one of the dyeing kits she stocks and got my fabric, gloves, mask, dyes, and soda ash all in a nice little package.  
Kind of neat, right?  So I took this pretty innocent looking white and black fabric and gave it a very *me* twist.  I'm kind of addicted to dying things now, and I really love the personal touch it gave this shirt, without it being over the top.

Jillian What I loved: I will definitely be wearing this shirt a lot this summer (I like how my tattoo shows, hmmmm.. I feel like that's an awesome trend with this bundle too!), and I love how it fits, an I definitely love all of the options that are included in it.

Jillian What I'd change:  There is only one thing that I would probably constantly change when making this.  The waistband is cut on the fold, so there is only one seam when its sewn.  I put this seam lined up with one of the side seams, but the obsessive part of my brain wants the seams to be symmetrical, but I feel like that is just me being a bit weird.  


And my awesome shorts.   I actually pre-tested this pattern.  I made the Bermudas for the pre-test because I am a bit self-conscious about my thighs, and I will tell you that SO much care went into making the fit just right on this pattern.  There are instructions on how to adjust the waist, so if you're like me and your hips are significantly bigger than your waist, your shorts won't fall down!  (Don't laugh, the struggle is real :p)

So for this post, I originally was going to make another pair of Bermudas, but it's been warm, and I really want to own a couple pairs of actual shorts... so I went for it!  And I really like them.  I used a stretch denim with a sort of tie-dye looking print on it that I found at Joann's. 


In case you hadn't noticed, I'm pretty, bottom heavy, so I HATE making bottoms for myself out of anything other than knit for PJs.  I can only fit a couple brands of store bought jeans that will fit over my hips and not be all weird and huge at the waist.  These shorts fit amazingly well.  I followed the instructions for adjusting the waist that are included in the pattern, and I am 100% sure that they aren't going to show my underwear when I sit, and my hips fit!

Clemence What I Love: I love how easy it is to adjust the shorts to make them fit nicely at both the hip and waist.  And I love how easy the pattern was to follow.  And that there are multiple lengths included.

Clemence What I'd Change: I think my next pair, I may cut them just a little longer than the short pattern calls for.  But, the pattern does have a length chart, I just didn't measure myself first!

And just to crack you up... Photographer Inara choce the pose.... She said I wasn't being cool enough with my awesome outfit... so here you go... BundleUppers UNITE!  (She calls is the Superhero pose)


So the bundle is almost over, but there have been lots of blogs of all the different patterns... so check them out!!
 

Sunday, May 3, 2015

Women's Bundle Up Blog Tour: MODKid Women's Malibu

Good morning!  Welcome to Day Three of the Pattern Revolution Women's Bundle Up Blog Tour!


I'll be posting a bit this week to show off the patterns I've sewn from the bundle, but let's start here with the gorgeous MODKid Malibu.  

*Disclaimer, I am totally and completely awkward when it comes to photos, so enjoy my attempting to follow Inara's instructions to "pose pretty."  


The details:
Sizes XS to XXL (30"-42" Bust and 32-44" Hip)
Made for knit fabrics
Two back options (crossover or solid)
Two lengths (mini or maxi)


I did the mini-length with the crossover back.  I am kind of at the top end of the fit for this pattern, and I feel like I could have taken it in a little, so there is definitely some give room if you're worried that it won't be big enough, don't worry!  In fact, my hips are definitely outside the measurements and I was a little worried that I might have to adjust the skirt, but it didn't need it.


This is me attempting to listen to Inara's constant critiques of me posing.  She was standing off camera on her play set yelling down at me.  She goes "Mom, your dress is pretty, how about you pose pretty too? AND take that frumpy sweater off."

Apparently, she doesn't love my cardigan... but it was a bit chilly, and I wanted to show that it layers up nicely for cool summer nights!


The pattern gives instructions for either using FOE for the binding or doing a knit binding.  I thought a pretty lace edged bias would look cute.

What I loved: I love that the back shows off my tattoo, while still allowing me to wear a bra.  I also like the A-line skirt shape, which I find to be much more flattering to my body type than a straight or gathered skirt. I also like that it has a solid back option for more modesty, if that's what you're looking for.  Also, this I thought was cool, the pattern gives 3 cutting lengths for the skirts: petite, average, or tall.  Which meant that I wasn't cutting a skirt that would end up being 3" too long, because I'm kind of short.


What I'd change: This one comes down to body type, I think, but when you add the elastic at the waistline, it gives the dress a better shape, but if you're like me and have a natural waist that is significantly smaller than your hips, it almost pulls the bodice up a little too far.  So I think for the next one I will shorten the bodice a little bit, so the crossover in the back sits more flat when worn.

This is my first MODKid Women's pattern, and I'm really happy with it.  I found the instructions to be easy to follow and understand, and the dress came together in about two hours from print to hem, which is amazing for a dress for me!


If you're still deciding which patterns to bundle up, this one is a yes from me!

Image and video hosting by TinyPic


And if you need more opinions and to see more options on all the patterns included (which come on, we all need to see more inspiration!), make sure you check out the rest of the bloggers on the tour

I've found that the best way to see all the posts, is to make sure you're following the Pattern Revolution Facebook Page!  


**Last disclaimer... this pattern was provided free to me in exchange for blogging about it, but all opinions are my own, and I picked it because I loved the teaser pics!

Wednesday, April 29, 2015

Pattern Review: Brueram Dress from Sofilantjes

I have a special place in my heart for Anne and Sofilantjes patterns.  I tested her first pattern, and various ones up to now, and I have found her to be kind and receptive in every test.  She listens to her testers and discusses proposed changes with us, and really makes you feel like part of a team.

So this new dress... is just beautifully done.  Meet the Brueram:
The details:

Sizes 12mo - 14yrs (designed for non-developing chests)
Three skirt options: top, dress, maxi (top and maxi use cutting chart for pieces)
Instructions for shirred or elastic casing for the back.
Made for Woven fabrics
Lined bodice and enclosed bodice seams.


The version directly above is the maxi.  I used a pretty shirting fabric I found at Joann's that just screamed SUMMER at me.  And Inara is totally in love with it.  The instructions were clear and easy to follow along.  They may seem out of order if you've never shirred before, but the way the dress is constructed nicely encloses the bodice seams AND locks the shirring in at the sides.


The straps are part of the front bodice piece and are angled to meet at the mid back.  The amount of stretch to the bodice allowed Inara to get in and out on her own.  I chose to shirr both of my dresses, because one I learned how, I really like doing it.  And amazingly, I've found that it doesn't itch Miss Sensitive skin, like I thought it would.

**I have a brother, if you do too, make sure you tighten the tension on the bobbin case like one full turn before shirring.. and don't forget to turn it back when you are done!

What I love: I love the multiple skirt options, and I think my absolute favorite part - the wide straps!  The straps are wide enough that the dress meets the dress code requirement for Inara's school, so she has pretty, light summer dresses to wear as it warms up!

What I'd change:  I think for time's sake, I might make the next dress with the maxi width measurements and the length more a standard dress.  I love the style of the faux-wrap skirt, but there is something immensely satisfying about a super-fast gorgeous sew!

It's a little hard to tell in my multi-colored batik, but the skirt of the dress version is done in a faux-wrap style that adds just a hint of whimsy to the pattern, and I totally love it.

The dress is on sale right now in the Sofilantjes Shop for $5... and it's worth that and more!  And once you grab it, if you join the Sofilantjes Sew and Show Facebook Group there are a bunch of really friendly people to help and chat with and show off your Brueram!


Wednesday, April 15, 2015

MCM Studio Designs Blog Tour - Estherlyn's Jumper

Hi! Welcome to day three of the MCM Studio Designs Blog Tour!

I was lucky enough to test the Love Bird Dress a couple monthds ago, and was really impressed with Linda's patterns, so when she said "blog tour?" I jumped on it.  And today I am going to show you a couple versions of Estherlyn's Jumper.
 

First, the details:
Sizes: 3m through 10yrs
Fully or partially lined options.
Made for woven fabrics
Buttons at shoulders
Cute Asymmetrical Apron
Multiple pocket/applique options included.

First up, the more traditional one... this one I used some Riley Blake and Michael Miller fabrics that have sat in my stash for ... well over a year... probably closer to two years, waiting for the *right* pattern.  I think I found it!


This is the fully lined version, with the apron and I used the included patch pocket that was included. From start to finish, this pattern took under two hours to complete, and I am totally thrilled with it.  Inara is at the top of the range for the size 6, so I did a size 7 with a size 6 length.


Inara's chest is 24.5", and the size 6 says 24" chest and size 7 says 26".  So I she probably could have had a more fitted look with the size 6, but as it is, it is just loose enough to wear a sleeved shirt underneath, since it's still cool here, it's perfect!

After finishing that one, I decided I wanted to show off another way the pattern could look.  So after a ton of browsing around on the Whimsical Fabric site, I picked a couple prints from the Sidewalks Line.  And then after (very little) more waffling, I added on some more of the Ruffle-Rac that I am totally obsessed with, and a couple of Riley Blake Buttons.  Okay, supplies all gathered... here's where I went with it:

Same dress... different look!  This is the partially lined version - so lighter for summer and beach wear... but still encloses all of the bodice seams nicely.  And I left off the apron, and instead added some ruffle-rac long the bodice.  *Squeal* I love it!!


 And used some of the included appliques, and the buttons I ordered, to add a cute detail to the bottom of the pattern.

I think together it creates the sweetest little summer dress.  And leaving the apron off, it took even less time to sew and still looks fantastic!  I had so much fun with this pattern. It's so fun to customize and the instructions were clear and easy to follow.


What I liked: The fit is spot on, the partial and full linings are both well written and enclose all the seams that would otherwise itch the heck out of Inara.  I LOVE how fast it is to sew, and the ability to highlight fabrics.

What I'd change:  I think the length is a little longer than I'd like to see for Inara, even though I did the size 6 length, Inara is at the bottom of the range for the size 6, so if I want a shorter look, I know to cut the 5 length for the next one.  That said, the measurements match the finished chart perfectly, so its not the pattern!

Through April 25th, all of the MCM patterns are 25% off.  They are already marked down in her Craftsy Shop and in her Big Cartel Shop use the code SPRINGSALE25.  I highly recommend both this and the Love Bird.  I haven't made the Ginger Snap yet, but some of the other bloggers have posted it, and I am totally in love!


And after that, make sure you check out the MCM Studio Designs blog.  Why? Well, first, so you can get the links to check out all of the other awesome bloggers.  And second, to find out how to enter to win a pattern of your choice!


Thanks for stopping by!

Friday, March 27, 2015

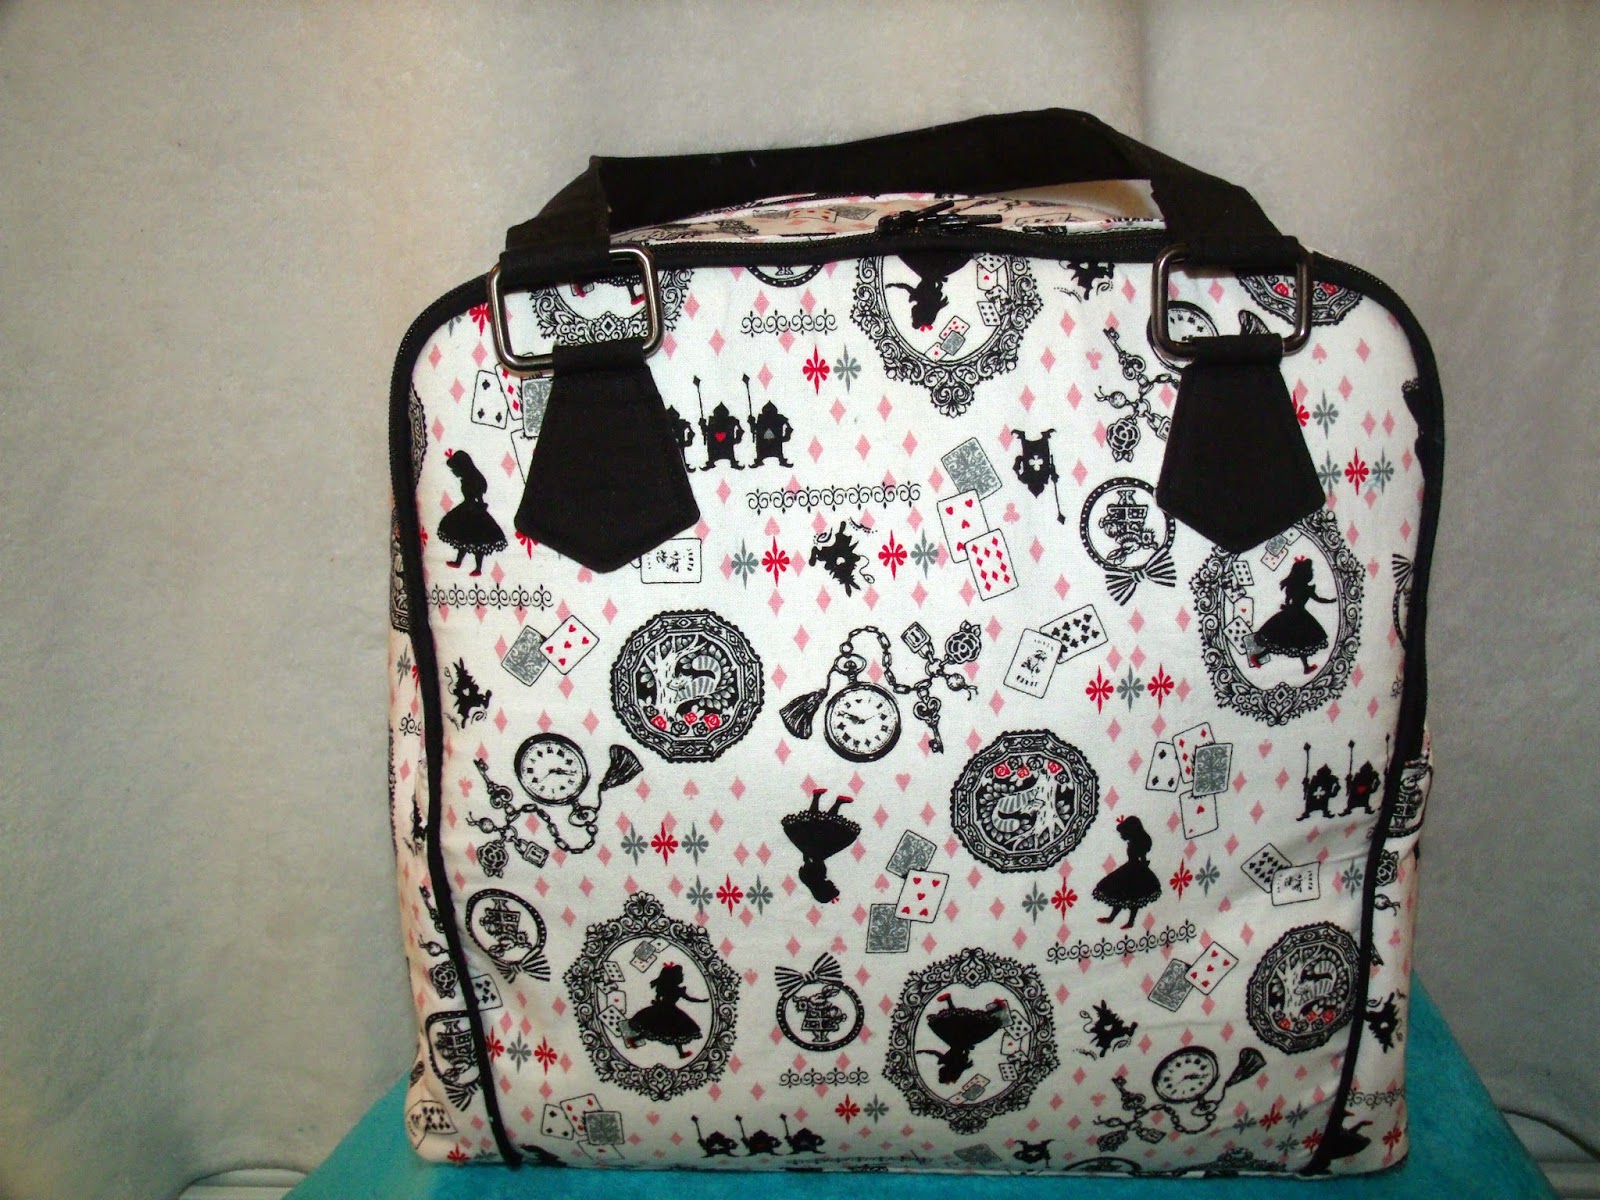
Pattern Review: Cozy Nest Ellory Bag

So I don't test a lot of bag patterns, though I feel like my bag making skills are slowly improving.

I find that testing for Cozy Nest Designs is a great way to improve those skills.  Her patterns push my comfort zone and show me how to improve my sewing and I totally love that.  So, meet the new Ellory Bag.


First, I want to give a quick shout out to my friend Kim who sent me this fabric that she got at a Quilting Con in Texas.  Isn't it just gorgeous??

Okay, now the bag details:

Finish size: 14w x 10.5h x 4d
Difficulty: Intermediate
Notions Needed: zippers, metal rectangles for handles, and (optional) bag feet

Loot I used bag feet!!

The finished size of this bag is perfect for someone like me whose bag gets taken to the park every day after school.  I can carry my wallet, water, and phone in one side pocket, and then I can fit the kids snacks, a diaper and wipes in the middle, and the always necessary pirate sword and spyglass in the other.


The bag has three pockets.  a big center pocket and two double zipped side pockets, so the bag holds plenty of stuff.

The side pockets use a type of stabilizer that was completely new to me, and is SO COOL.

I'll let you get the pattern to see how cool it is!

And with the lovely finished lining, you can coordinate the inside with multiple fabrics.


What I love:  I love the big pockets and I love how the bag is constructed and stabilized. Plus the instructions were easy to walk through.

What I'd change:  I think for my next one that I will add a nice little zipper pocket to the inside.  The other thing is that I would machine stitch the pocket lining to the outer... man my fingers were killing me after that hand stitching.  (The pattern says to machine stitch, but my arms kept getting in my own way, so I hand stitched).


The bag is so nicely stabilized and it holds it's shape without being weirdly stiff.  It took me a while to make this, though since it is a bag and it was my first time using the pattern, I don't think my time table would be accurate with someone who has a lot of bag making experience.  But, I will definitely be making another one of these, because I absoluley love it and I get tons of compliments on it.


Excuse the slight blurriness of this one.. I was out to lunch with the kids and decided I needed a picture of how the bag sits when you press the top handles together.  The angled shape of the bag makes it the perfect everyday bag in fabric like mine, or you can make it great for nights out with some fancy vinyl fabric (check out the listings for some awesome fabric ideas!).

In case you missed the link at the top the pattern is available in the Cozy Nest Pattern Shop and her Craftsy shop.   While you're in  Craftsy... can I HIGHLY recommend grabbing the Convertible/Reversible Bag!


Tuesday, March 24, 2015

Little Kiwi's Closet Bow Back Beauty

So this new pattern is awesome... like totally and completely awesome.  I know I'm a sucker for Little Kiwi's patterns in general... but this one is just amazing... Yes, I tested it, but even bigger YES you need it.

The Bow Back Beauty From Little Kiwi's Closet is fantastic!


This pattern has a ton of options.. let me try to lay them out for you...
Sizes: NB - 12
Bodice options: natural waist, hip length, or onesie (NB-4)
Back options: Bow or plain (AND bow can be layered over plain for modesty or cold weather!)
Skirt options: Peplum, Dresss, High-low
Sleeve options: Sleeveless, Short Sleeve (with or without cuff) and long


This one is the hip length, with peplum and long sleeves.  For the fabric I used a reversible double knit from Joann's.

The binding was done in a nice ribbing that my local sewing shop carries...  Seriously, this store carries like 100 colors of ribbing and I have no idea why, but I love it.

Anyways.. I finished the peplum with a rolled hem and added a pretty crochet flower that I got from  Whimsical Fabric.


I love how elegant this combination looks.  I think the pink and black paired together makes a really darling combination, AND its perfect for cool spring weather in Washington when paired with our favorite Skinny Legs legging pattern.


In fact, she already wore it to school and got tons of compliments!


Next up I made my more "casual" version.  This is the short sleeved, natural waist, with a peplum and longer skirt underneath.  The skirt is the size 4 dress length, because I wanted a less dressy length than the dress version, and I think it worked out perfectly.

For this one I used a shirt to upcycle for the bodice, and did the skirt, peplum and binding in solid cotton lycras from PurpleSeamstress Fabric.  

The pattern specifically says to use good quality knits with nice stretch and recovery, like cotton-lycras.  I'd like to offer an apology for failing to listen to Lydia here... and here is why..  the t-shirt knit doesn't stretch nice like a cotton-lycra blend would, so it ended up a bit more fitted than the other two versions.  It still fits her, but if you're going to go with a less stretchy knit.. I suggest sizing up a little so you get more wear out of it.

And last is my favorite.  It's elegant, dressy, and still comfortable enough that she's picked it out to wear to school tomorrow... (granted its cold and rainy, so she's wearing a Bella Bolero over it, and leggings under).


This is the sleeveless, natural waist, dress version, with an overlay.  I cut the dress at the length written in the pattern and cut the overlay three inches shorter.

The main dress fabric is a stretch panne, and the overlay is in a stretch mesh with glitter embellished hearts.  The binding is a really nice poly-cotton-lycra ribbing.  I think she looks like a princess in this one.

What I love: If you couldn't tell, I really love all of the options this pattern gives, and the various ways to dress it up or down depending on options and fabric combinations.

What I'd change: So far as the pattern goes, the fit is fantastic, and the options are all clearly explained and easy to follow.  As for me, I need to write a note on my pieces to size up when using fabrics that aren't the pattern recommended ones!

So, hopefully you're still reading.. and if you haven't bought the pattern yet... here's the link again: Click Here!  Grab it while it's still on sale - its worth every cent for all of the awesome combinations you can make!


Tuesday, March 17, 2015

Bella Sunshine Designs Holiday Cutout Blog Tour: Day 2

Welcome to Day Three of the Bella Sunshine Designs Holiday Cutout Blog Tour!  And Happy Saint Patrick's Day!

Since it's St. Patty's Day, I decided to give you a look at the shamrock cutout version.  And here is our take on the Bella Sunshine Designs Holiday Cutout Top and Dress.

The details:
Sizes 12m - 10
Dress or Top Version
Instructions for Cutout or Applique
Includes 6 different shape printouts.


I did the dress version with both an applique and a cutout.  The cutouts come in three sizes and the pattern includes recommendations on which to use for different size kids.   I used the recommended medium sized cutout for Inara's, since she is a size 6 and I think the size is great on her.


I also added an applique to the skirt as well.  I wasn't sure if it was *too* much, but Inara insisted it was needed, so I went for it.  The pattern even includes instructions on how to applique the design on nicely.


I think what I love most about this pattern is that it is really easy to customize how you want.  Not even just with fabrics and cutouts, but you can make the skirt pieces wider for more fullness and twirl, or you can even do the skirt in knit if you wanted.  Or you can do what I did... FOE instead of the straps.  I was going to do the tie straps in green to pull it all together, but with tie straps, she wouldn't be able to wear it to school, so I decided to try something a little different and make the bodice binding and straps out of FOE, so that they would stretch to go on and off, but wouldn't be able to be untied!


We also decided to stick a shirt on under it since she wanted to keep it on all day and its a bit chilly here still...


What I love about it:  I love how it's so easy to customize... Have you seen some of the other bloggers on the tour (You can see the other two for today here!)?? There are all sorts of personal touches you can use with this pattern as a base.

What I would change:  The bodice is attached to the skirt so that you enclose the waist seam (yay!), but the way it's attached requires you to top-stitch that seam where I'd rather whip-stitch the lining closed, and forego the top-stitching.  But that's personal preference, isn't it?


Really though, the pattern is fantastic.  The fit was perfect without any adjustments, and the instructions are clear and easy to follow.  Here's an endorsement.. I actually tested the leggings and not the top, but bought the top when it was released because I really enjoyed the testing period and liked her writing style and the care she put into the fit and instructions.  There is even a free pattern in her shop if you want to check her out before buying!

While you're grabbing this great pattern, you should definitely grab the Bow Tie Leggings from the Bella Sunshine Designs Shop as well... I made them for Inara to go with this top... and the bows can be done in knit or woven, so they match the dress!!


Don't laugh too much at her shoes... she got them from a consignment sale and wears them ALL over the place.  As for the dress... we both love the look of it... feminine and well fitting, without being over the top.  It's perfect for my fickle child!

The code: BLOGTOUR will get you 20% off both patterns here, so grab them while they are on sale... then make sure to check out all the other awesome bloggers for the week!

Thanks for stopping by to check out my dress!

*disclaimer: this post includes affiliate links, but all opinions are my own!