Wednesday, November 19, 2014

Sew Straight and Gather Uptown/Downtown Expansion Pack Blog Tour and Giveaway

So I am totally excited to be part of this tour, because I absolutely love this dress. Welcome to Day Three of the Sew Straight and Gather Uptown/Downtown Dress Expansion Pack Blog Tour!

Make sure you check out these other ladies too.  You can get the daily roundup on the Sew Straight and Gather Blog.

I tested the original version of the dress this summer.  If you were reading me then, I didn't do much I blogging or testing over the summer because I took an extended trip to visit my parents in New York. I had followed Terri's blog though, and when she posted the tester call, I jumped on it and crossed my fingers.

Sew Straight and Gather Uptown/Downtown Expansion by Keep Calm and Carrion

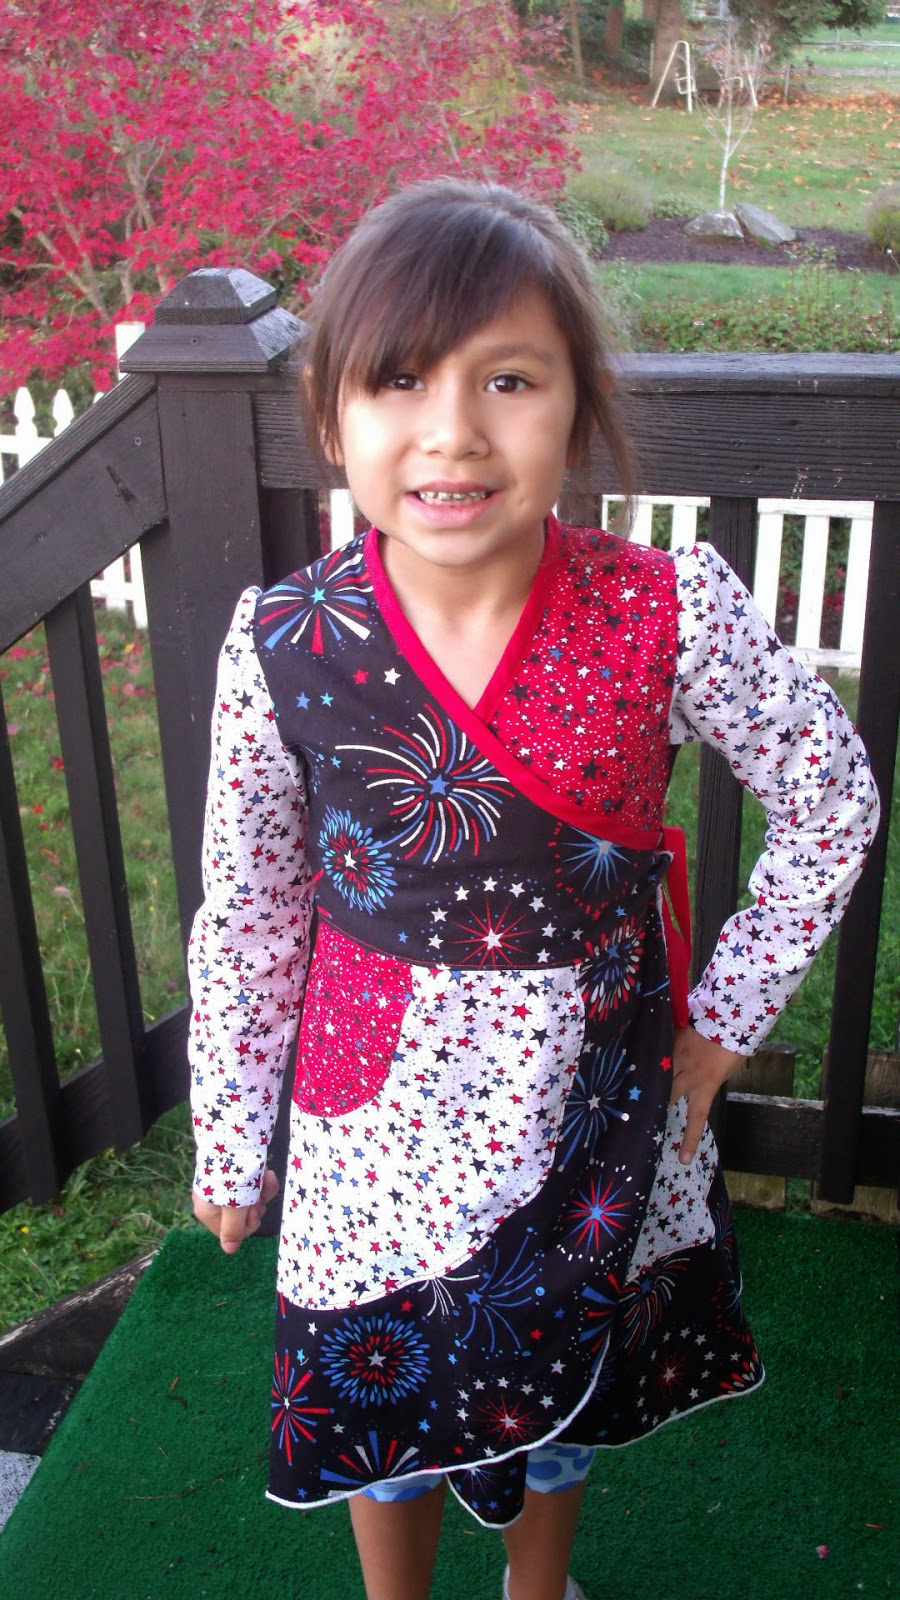
The dress was just perfect for the Fourth of July party we were going to, and Inara was a total hit in her cute outfit.
The basic Uptown/Downtown Dress comes with the following options:
Sizes 2 through 10
Sleeveless, cap and 3/4 sleeves
The cap sleeves are lined so you can make a cute contrast here as well.
lined bodice.

Sew Straight and Gather Uptown/Downtown Expansion by Keep Calm and Carrion


The fit and flare style of this dress is extremely flattering and makes this dress work for both dress and casual occasions, depending on your print choices.  And the cute twirl that goes from the flared angle on the skirt is so much fun for my twirly kid.  Now as we move into cooler weather, the expansion pack has made me add this dress to our winter staples.

And she's even wearing at school right now with a pair of leggings!

Sew Straight and Gather Uptown/Downtown Expansion by Keep Calm and Carrion

The expansion pack includes:
Cowl Neck
Long sleeves
Pockets
Maxi Length
Tank Straps
Contrast band

Sew Straight and Gather Uptown/Downtown Expansion by Keep Calm and Carrion

For ours we used the Long Sleeves, Cowl Neck, pockets and Contrast Band.  I had 1 yard of this cute Hey Diddle Diddle interlock and some leftover brown interlock from Connor's Halloween costume.  I wasn't sure that Inara was going to like the print, but after scouring the knit shelves and Joann's, she had found nothing.  I pulled this out of the destash pile and she just loved it, so I am really glad that I hadn't listed it!  The Interlock makes it nice and snuggly for winter while still being super soft.  

Sew Straight and Gather Uptown/Downtown Expansion by Keep Calm and Carrion
 How cute is this print?  She has been walking around for the last 4 days repeating the nursery rhyme over and over.

And I made her a little headband to go with the dress using the leftover scraps and a simple blue button from the button box.
Sew Straight and Gather Uptown/Downtown Expansion by Keep Calm and Carrion

I promised her next pay day that we can order a new knit to she can have a maxi version as well.  I'm not sure who is more excited to pick out fabric, me or her!  

Inara is really into cowl necks lately for cooler weather, so she was really happy with that add-on, and of course every little kid loves pockets, right?  She even decided that she needed to find a prop for photos...

Sew Straight and Gather Uptown/Downtown Expansion by Keep Calm and Carrion

Both Inara and I highly recommend this dress, and mommy and picky kid approved has to say something!

The best part of the expansion pack? It's free!  So if you already own the dress, just pop over to the Sew Straight and Gather Blog Shop and download the expansion pack.

If you don't own the pattern, the code UPTOWNEXPANSION25 will get you 25% off in the Blog Shop or the Etsy Shop.   (It also gets you 25% off the Etage Dress and Top too, so I would totally grab both while you are there!)  

And, make sure you enter the Rafflecopter for a chance to win a copy of the Uptown/Downtown.  


Thanks for stopping by!  And to leave you with a funny note... Connor was jealous of how much fun Inara was having during her photo shoot:
Sew Straight and Gather Uptown/Downtown Expansion by Keep Calm and Carrion


Tuesday, November 18, 2014

Perfect Pattern Parcel #7: Handbags Galore!

Good morning! Welcome to my day of this awesome round of the Perfect Pattern Parcel.  This parcel is very exciting.  To start with, this is the LAST parcel of the year, so I'd really love to see huge support of this one so the awesome people behind the parcel can meet their goal and donate tons of needs to school kids!

Pattern Parcel #7: Choose your own price and support DonorsChoose. Win/win

If this is your first time hearing about the PPP, here is what it's all about, right from the mouth (fingers?) of the founder...


"Here at Perfect Pattern Parcel, we believe in supporting independent pattern designers. It’s our opinion that indie patterns are just, well, better than big box patterns, and we’re pretty sure our customers think so too. So, we allow customers to show their support in naming their own price for each Parcel.  We also encourage customers to allocate part of their Parcel price to the charity Donorschoose.org in order to help classrooms in need. Pattern Parcel donates all profits after expenses from Parcel sales to the charity as well. Its our goal to raise over $20,000 for Donors Choose this year."

And you only have have FOUR MORE DAYS to get in on this awesome deal. To start with, the pattern collection of this round is just awesome. AND, because I really want to encourage you to spend enough the get the *bonus* pattern, that's the one I've chosen to sew up! Meet my Daphne:

I am totally in love with this bag.  Once in a while I get a hankering to quilt, but I am really not a very good quilter.  So this bag... totally scratched that itch

**Editing to add the pic I took on the way out the door this morning with my bag all packed**
Bag is holding: 2 diapers, wipes, extra pants for Connor, bottle of water, bottle of gatorade, various kids snacks, wallet, phone and keys... AND there is room to spare!


Before I start gushing over my bag, let me break down the patterns in this parcel... 
Parcel #7 includes:

Barcelona Bag and Wallet by Pat Bravo
Butterfly Sling Purse by Emmaline Patterns
Evelyn Hangbag by ChrisW Designs
Midtown Messenger Bag by Betz White
Betty Bowler by Swoon Sewing Patterns
BONUS PATTERN: Daphne Bag by Clover & Violet

What's a bonus pattern? Choose a price of $32 or greater for Parcel #6 and you will automatically also be sent the Bonus Pattern! That's only $5.33 a pattern. This is a brand new, never been seen before pattern and is an exclusive opportunity for Parcel #7 customers!


Pattern Parcel #7: Choose your own price and support DonorsChoose. Win/win

I have to say, this pattern was so much fun to sew.  The directions were clear and easy to follow, and I really enjoyed playing around with my fabrics..

All of these fabrics came from my stash... I have these three packs of charm squares from Anthology fabrics that have been sitting on my shelf for a year now waiting for a project.. The best part? They are 40 square packs, so I can make TWO BAGS out of each pack!  The other batik's in the picture are also Anthology Fabrics batiks.


The bag has two inside pockets, as well, which are a total requirement when I make a bag... or I'm constantly losing my keys and phone (which I do anyways...).  I love how all the different pieces come together to and it was so much fun to play with the different accent prints.
Even the strap has a cool accent piece!
By the way, make sure you find your hardware in advance!  My Joann's doesn't carry the rectangles or sliders and neither does my Walmart, or either of the local quilt shops.  BUT, here's what I did and I think that if you find yourself with the same problem, this solution may help you.  Our town has this thrift store (not Goodwill, they were kind of spendy) that helps fund the local homeless shelter.  I go there every now and then and raid their sewing section for $.25 zippers (used on this purse!!) and other cool notions for super cheap.  Well, I went this time to the purse area... and bought an ugly old bag for $.99 with the slider and rectangle thing on, and cut off the strap and voila!


As for the other patterns in this parcel... when I got the pattern list, I was super excited to see two patterns that I already own... I will recommend without reservation anything that Swoon makes and I may have a few Emmaline patterns that are sitting in my *make me* file.

Pattern Parcel #7: Choose your own price and support DonorsChoose. Win/win!

So for all the right reasons... Awesome patterns, great price, AND great cause... Go out and grab this parcel... and I know it's close to the holidays, but these prices are spectacular, and if you're still looking for Christmas gifts... these are perfect!


Tuesday, November 11, 2014

Ellie Inspired Holiday Tour: Tinsel Party Dress

Hi!  Welcome to Day Three of the Ellie Inspired Holiday Pattern Tour.  If you haven't checked out Crazy, Crafty, Haute Mama on Day One and Knot Sew Normal on Day Two, you really should... I'm in awe of the gorgeous work these ladies do.

But today is my day! And I am really excited to show off the pattern I chose for the tour.
**I did receive the pattern for free, BUT all opinions are my own**


Meet the Tinsel Party Dress.  Possibly my new favorite Ellie Inspired Pattern (which, if you could see my embarrassingly large collection of Laura's patterns, is definitely saying something).

The details:
Sizes 1 - 16
Optional overskirt and tulle skirts
Optional split bodice option
Button back closure
Instructions included for Lattice smocked sash.

First, one of huge draws to Laura's patterns in general is the great size range.  The style of her patterns is so classic, they they work for toddlers and tweens, so you'll get lots of use out of the pattern.

Second, the small details that you can change in this dress make it so easy to customize for your child.  My daughter has issues with *itchy* fabrics... for her that seems to include anything at all sheer.  So we made our dress with a Brocade Fabric from Joanns paired with Casa Collection Satin.

I begged her to pick the red and gold Brocade, so I could pair it with some green satin and make a Christmas dress, but she was insistent on the Aqua/Pink combination.

Laying a rose at the Veteran's Memorial
 The pattern construction of the dress itself results in a gorgeous professional finish inside and out, with no seams exposed to itch Inara!  And the curved overskirt is so elegant with the dress.   For Inara's dress I did the split top bodice using the brocade for the main part and the satin as the accent piece.  I then did the overskirt in the brocade as well and the "lining" in the satin.  I left the tulle off completely as there was no way she would be able to handle it.  

With the well written and professional instructions, the dress itself can be sewn in just a few hours.

She's trying to show off her missing tooth


And then I looked at my dress, smiled at how much I loved it... and swore under my breath...  Why?  Because here is the reason that I absolutely love Ellie Inspired patterns..  Laura finds a way to constantly challenge me and make me try new things and it makes me grow as a seamstress.  

For this dress the new technique for me was the lattice smocked sash.  I had never done anything like that before, and for two days I nervously stared at what was, for all intents and purposes, a complete dress.  And then I took a deep breath, decided to stop being a wuss, and sat down with the chart and my fabric and turned on Netflix.  


If you have never lattice smocked before, here is my one bit of advice as a newbie.. I found myself having a hard time keeping my columns straight once I started, so I went back and changed every other column of dots to tiny "x"s instead.  Also, as a left-hander, I find my hand getting in my own way, so I stopped at the end of each column and started fresh at the top for the next set.  So it's not *perfect,* but I am insanely happy with it, and I just LOVE how the dress looks with the sash.


She looks totally happy right?  So this is how much she loves this dress... It was gorgeously bright and sunny for pictures.  Not a cloud in the sky.  The only problem?  It was like 40 degrees out away from the water, and colder even still on the water and with the windchill.  But she stood out there and smiled and posed like a champ, even when the wind got the best of us...


We decided our first photo location was too windy and moved away from the water, so it was still barely 40, but less windy.  And without any complaints, she jumped out of the car to show off her dress.  Connor was even excited to pose with his sister who he declared to be a "boo-tiful pin-cess."


So yet again, I've learned a gorgeous new sewing technique from one of Laura's patterns, and we have a dress that is just so stunningly pretty that I keep grinning over the fact that I made it.  

If you missed out on the deal when the new holiday patterns were released, now is the best time to grab them... with the code PARTY you get 25% off in the Ellie Inspired Pattern Shop.

And make sure to swing back through the Ellie Inspired Page to see the rest of the bloggers posting this week, and stop by and join the Ellie Inspired Patterns Group.  It is one of my favorite groups on Facebook... everyone is so helpful and friendly, and there are some insanely talented ladies there!

Before I sign off, I just want to extend a huge thank you to Laura and the Ellie Inspired team for letting me be part of this tour.  I am so glad that I stepped outside my comfort zone with this one, and so is Inara!  

Friday, November 7, 2014

Pattern Review: Iridis Wrap Dress from Sofilantjes

Sometimes when I sign up to test a pattern that has lots of options I like to click the "whatever you need" square on the sign up.  If I show Inara the pattern and she likes all the versions, then for me, its already a win.  That's what I did for this dress...  Meet the Iridis Wrap Dress from Sofilantjes.

This is Inara this morning on her way to the Veteran's Day assembly at her school.  It's a special holiday for our family, and I'm pretty sure she had the cutest dress there!

My version is the woven, long sleeved version.  This dress has a couple variations, so let me lay those out first..

The Details:
Sizes 12mo through 14yrs
Woven version wit curved cutouts sewn together
Knit version with curved layers
Long or Short sleeves
Wrap style dress


I have to say, the most daunting part of this pattern is cutting out all the various pieces.  Once that is done, you'll find the dress to be an extremely fast sew, with only a tiny amount of gathering required (on the sleeves).   I think all in all the dress took about 2 - 2 1/2 hours including pattern taping/cutting and sewing.  I was a bit paranoid about cutting pieces out backwards, so I think I took longer to cut fabric than I usually would.


I do love how this came out, and Inara loves her "America dress."  I did topstitch my panels as I went, as I was a little worried that they wouldn't sit flat if I didn't.


The only other change I made was last night I took a minute to put a snap on the side where it crosses over and one on the opposite side as well.  This totally isn't necessary, as the dress fits well and covers well, BUT I was a little worried that Miss Fidgety would play with the ties and untie them, or someone at school would randomly pull on them.   If anyone wants to know where I put my snaps, I can take a picture for you.  I'm sure it is just silliness on my part, but I do this on all the wrap dresses we make, and this way I don't worry about it.


Considering how far this is from our standard color choices, I'm really happy that she loves it so much, and I think it's definitely due to the fun style of the dress, and that she got to spend all sorts of time deciding which color she wanted where.

AND, I really want to show you the knit version, because its got these really cool layers instead of the curves sewn together... so my darling friend +Kimberly Odell  made the knit version with some fun ruffle fabric...

First of all, how gorgeous is this in that fun ruffle print??  And second of all, do you see how the layers are on the knit version? It's just so pretty and whimsical... I love it.  *Note to self: must get more girly knits. (or convince Kim to make me one?)

Okay...now, the dress is on sale for $6.25 through the weekend and then it goes up to it's regular price... so buy it while it's at this super price... Here is the Craftsy Shop and here is the Etsy Link.  If you don't have her other patterns... the Omni Tempore is pretty awesome too.  As is the Summer Surprise, but not so season friendly here in the PNW at the moment!

Now... these are terrible... from the audience, balancing a toddler photos... but here is Inara singing at her assembly today...


Would you believe her hair was just put up nicely like an hour before this photo? *sigh* I totally understand my mom's fussing about my messy hair now...  And the little pants underneath... hysterical right?  She assured me that blue matches blue, though.

This dress is so perfect to customize for any event/holiday, and with the sleeve choices is great for year round wear as well.    Huge thanks to Annemieke at Sofilantjes for allowing me to test such a fun pattern.  And check out her blog for lots of other cute tester pics!

Wednesday, November 5, 2014

Pattern Review: Holly and Ivy Dress from GYCT

This last week I tested a very pretty holiday dress for Inara and I am really excited to show it off.

Meet the Holly and Ivy Party Dress from the very talented Chelsea at GYCT Designs.  

This dress has A TON of options.. so let me lay them out first...
Sizes: 3 months through 12 years
3 Necklines: round, square, and sweetheart
3 Sleeve styles: sleeveless, short, and long
2 lengths: knee and mid-calf
Back button closures
Optional over-skirt instructions


Inara is wearing a size 6, sweetheart neckline, knee length, sleeveless, with snap closures.  And she loves it.  

My mom sent me the pretty skirt fabric from their last trip to Peru.  It's like a (faux?) silk taffeta with the lace overlay on it.  It was just so pretty and such a nice weight and I've been staring at it for ages. When I got selected for this test I knew I was going to use it, but all I had on hand was some cheapie costume satin, and I was a bit worried that it would fray and that it was too shiny and really too light weight overall.  So I ran over to Joann's and picked up some Black Bridal Satin and some Lining Fabric.  Then after I got the bodice together I was sort of disappointed with myself.. it was too blah... so before sewing the underarms, I went back and embroidered the flower onto the bodice.  


Once we got the skirt gathered and on, Inara and I had the following discussion.. Buttons or snaps? Let me try it on.  Okay....  Buttons or snaps?  Hold on, let me look at the buttons.  Okay... Buttons or snaps?  Wait mom, Can I wear a shirt under it when it gets cold?  Yes, buttons or snaps?  Ummm... snaps, definitely snaps..buttons are itchy.  <and off she ran>


So I left the snaps a little farther out than I normally would, since it is winter here, and she does love the dress, I want her to be able to wear something under it if she wants, though knowing her, I'll end up having to make something to go over it.  

AND... I don't have the opportunity to make this in tiny sizes much... so I just have to show you the tiny size 3mo I made to send off to my friend Geoff for his gorgeous little one (really, I should pack these things up, this pile is getting out of hand, but I don't get to sew for tiny littles much....)

I'm hoping it'll fit her around Christmas time, but if not, I can always make another ;)  I have this print in blue/silver as well, but it was just so elegant with the reds and pop of gold.  

And since I didn't have a tiny model to show it off... Hello Kitty has been making a good stand in for tiny baby.

The three month is sweetheart neckline, sleeveless (maybe I should send a bolero too?), and mid-calf length.


The pattern is well written and easy to follow along.  The fit was right in line with the chart and after all the feedback came in, Chelsea did her magical tweaking to make it look perfect.  The pattern pieces are clearly labeled and easy to piece.  The skirt pieces are rectangles, so there is a chart for them.  From printing to hemming, the dress took me about 2 - 2 1/2 hours.  Which for some perfectly gorgeous party dresses for the season, I think is time well spent!

So the pattern is available on Etsy or Craftsy.  And is on sale for $5.95 until Sunday the 9th. You definitely should grab it while it's on sale, and start picking your fabric, because....
Join the GYCT Designs Facebook Group so you are ready for the sew-along!


Monday, November 3, 2014

Little Kiwi's Closet Pimp That Pattern Blog Tour: Day 3

Hi! Welcome to Day three of the Little Kiwi's Closet Pimp That Pattern Blog Tour.  I'm very excited to have you!


So let's start with the pattern.  There were two options for patterns for the tour and I decided to sew for Inara, so meet the Flutterby Romper. (On sale at that link for 30% off during the tour).

I tested this pattern as well, and had a lot of fun playing with all of the options during testing...
So let's talk options first.
Available in sizes NB through 12yrs
6 sleeve variations in 4 lengths
4 leg variations in 2 lengths
Crotch snap option
Made for woven fabrics (but that pink one on the left is knit shhhh)

The fit on the pattern is fantastic, and the instructions have tons of pictures to make it easy to follow along.  And if you find yourself confused about anything... there are loads of helpful people in the Little Kiwi's Closet Facebook Group.

I danced around a bit trying to come up with some cool inspiration to pimp the pattern, and finally decided to honor the geekery of this household... Have you heard of Gamergate?  It's causing quite a stir lately, and though I think some of the treatment of females in the industry is awful, I never really considered the character representation, until last week... when after two hours of searching we finally picked a game character that met three conditions... (1) Inara thought they were cool (2) They served a big enough role in the game to be known and (3) they wear enough clothes that I could modify a romper to work.   That last one was rough.   So... here are my fabric choices....


No idea where I'm going with this, huh?  I wasn't totally sure either.  Let's start with the bottom one....

This one was a super pimp... lol.  SO I used the short sleeves with elastic for the top, and instead of attaching the pants or shorts from the pattern, I cut a full circle skirt for the bottom, and attached it the same way the pattern called for.  I also added a little Pokemon ribbon trim to the bottom, in case her outfit wasn't obvious.  Though, with Piplup on her head, I think any fan would get it.  **She's Dawn from Pokemon**

I originally cut three front bodice pieces to make the V in the front, but I didn't consider Inara's seam issues, and she flipped, so I ended up started all over with the front bodice and just taking a solid front and stitching the triangle onto it.

*Beanie is the For All the Family Beanie from Filles a Maman
Best part?  She picked it out to wear to school today! So its inspired enough that she loves it, without being too costume-y for daily wear.

And... now we move on to our video game character... are you ready?

Meet my little girl appropriate, not quite so skin tight, perfect for fighting off bad guys Lilith inspired Romper.  (from Borderlands if you are staring blankly at the picture).

I did the same V on the front as I did on the first one.  I narrowed the legs on the pants a little from the crotch point down, and then pieced the legs using a faux-distressed jegging fabric paired with a distressed (fake?) suede like fabric.  I was going for a more girl appropriate version of the outfit Lilith wears in the game.  Inara was totally excited about it.  Though her Lilith smirk needs some work...

Lilith is up there in her favorite characters, so she is totally thrilled with her outfit. And I am excited that she gets to play as a cool, strong female character... because she never wants to be rescued, she wants to be the hero.  I'm actually really grateful for this blog tour, because it gave me a chance to help her highlight qualities she admires in the females she sees on TV and in games.

The pattern itself is a fast sew, no matter which options you choose.  The pattern pieces print in color, but if you are a black and white only printer, they are laid out so it's easy to just highlight the size you want before cutting.  The pieces go together easily, and the only measurements on the pattern are the elastic for the neck/waist and arms/legs if you choose those options.  The pattern takes about 90 mins - 2 hours to sew (I think I am just really slow at pressing casings because I am paranoid they will end up crooked).

So here are the links to BOTH of the patterns you will see on the tour (grab them during the tour while they are on sale:
Flutterby Romper
Flutterby Playsuit

AND please take a few minutes to check out the rest of the posts for the week, and the awesome creation from Bethany posting today as well.


3rd November

4th November

5th November


6th November

7th November

8th November


Thanks for stopping by!!  And check out the linky too!