Friday, March 27, 2015

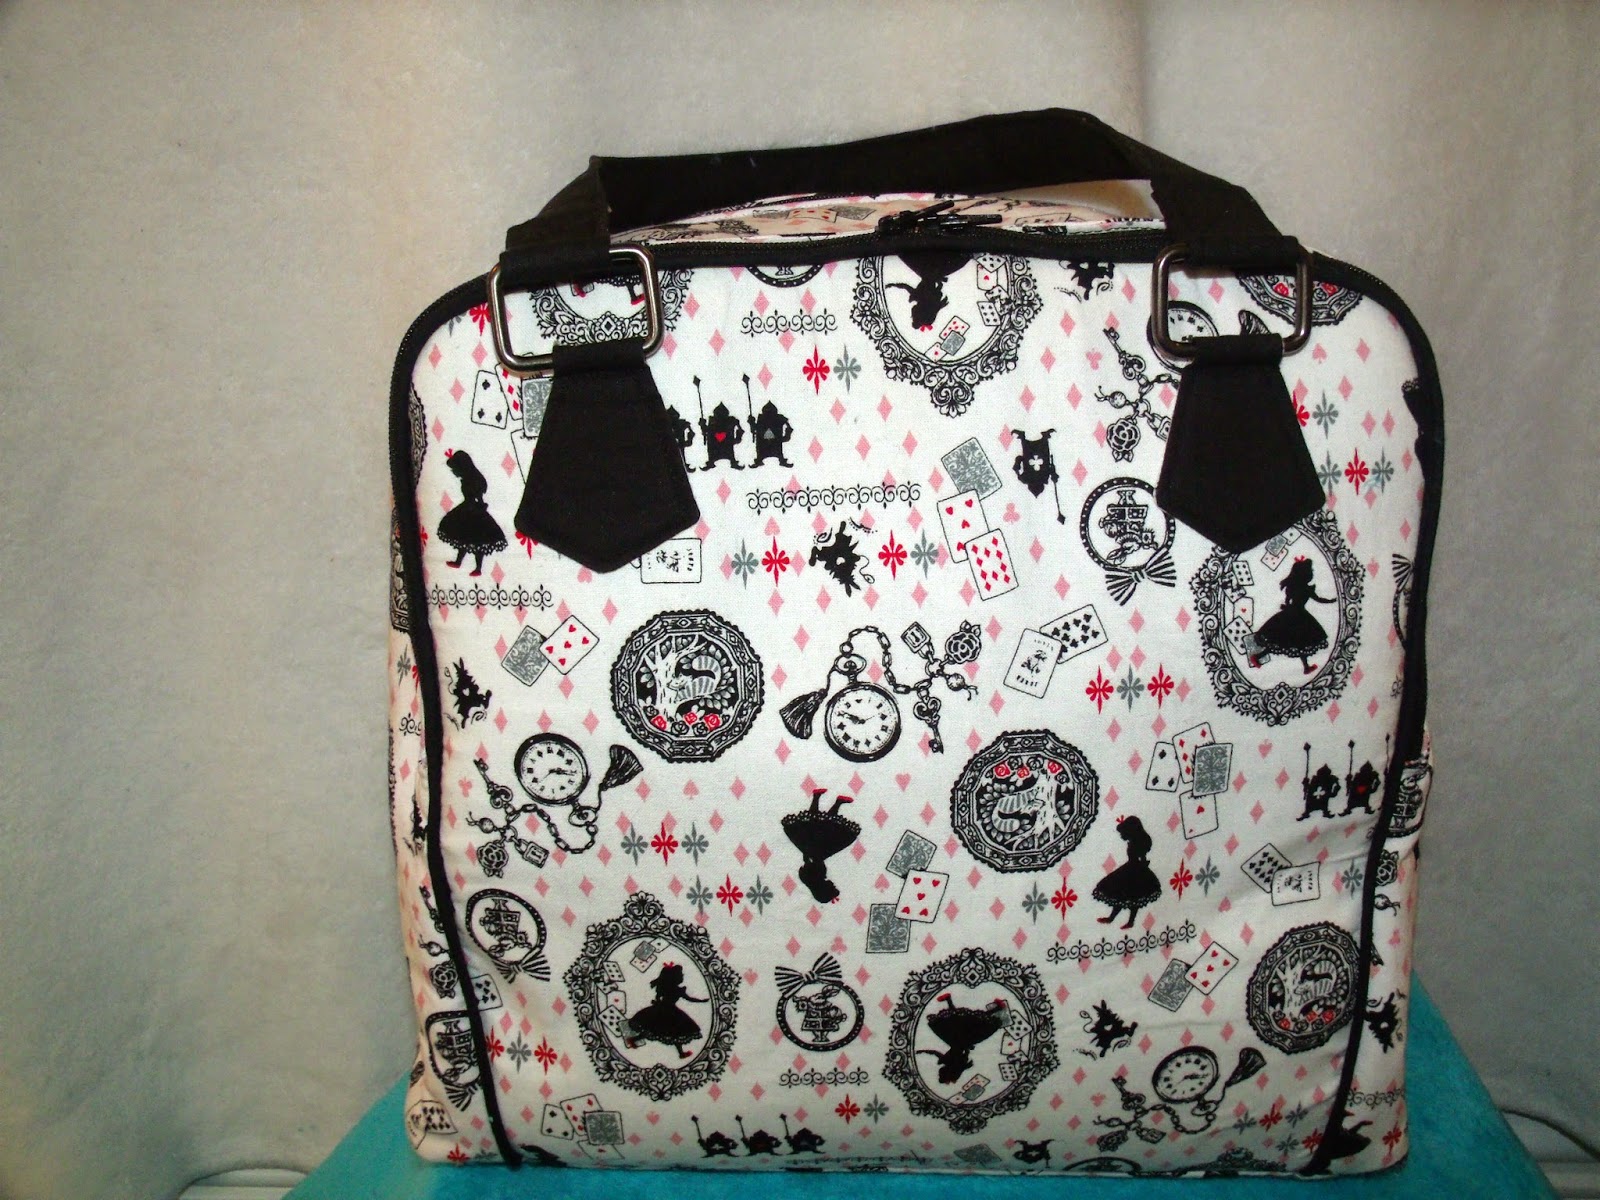
Pattern Review: Cozy Nest Ellory Bag

So I don't test a lot of bag patterns, though I feel like my bag making skills are slowly improving.

I find that testing for Cozy Nest Designs is a great way to improve those skills.  Her patterns push my comfort zone and show me how to improve my sewing and I totally love that.  So, meet the new Ellory Bag.


First, I want to give a quick shout out to my friend Kim who sent me this fabric that she got at a Quilting Con in Texas.  Isn't it just gorgeous??

Okay, now the bag details:

Finish size: 14w x 10.5h x 4d
Difficulty: Intermediate
Notions Needed: zippers, metal rectangles for handles, and (optional) bag feet

Loot I used bag feet!!

The finished size of this bag is perfect for someone like me whose bag gets taken to the park every day after school.  I can carry my wallet, water, and phone in one side pocket, and then I can fit the kids snacks, a diaper and wipes in the middle, and the always necessary pirate sword and spyglass in the other.


The bag has three pockets.  a big center pocket and two double zipped side pockets, so the bag holds plenty of stuff.

The side pockets use a type of stabilizer that was completely new to me, and is SO COOL.

I'll let you get the pattern to see how cool it is!

And with the lovely finished lining, you can coordinate the inside with multiple fabrics.


What I love:  I love the big pockets and I love how the bag is constructed and stabilized. Plus the instructions were easy to walk through.

What I'd change:  I think for my next one that I will add a nice little zipper pocket to the inside.  The other thing is that I would machine stitch the pocket lining to the outer... man my fingers were killing me after that hand stitching.  (The pattern says to machine stitch, but my arms kept getting in my own way, so I hand stitched).


The bag is so nicely stabilized and it holds it's shape without being weirdly stiff.  It took me a while to make this, though since it is a bag and it was my first time using the pattern, I don't think my time table would be accurate with someone who has a lot of bag making experience.  But, I will definitely be making another one of these, because I absoluley love it and I get tons of compliments on it.


Excuse the slight blurriness of this one.. I was out to lunch with the kids and decided I needed a picture of how the bag sits when you press the top handles together.  The angled shape of the bag makes it the perfect everyday bag in fabric like mine, or you can make it great for nights out with some fancy vinyl fabric (check out the listings for some awesome fabric ideas!).

In case you missed the link at the top the pattern is available in the Cozy Nest Pattern Shop and her Craftsy shop.   While you're in  Craftsy... can I HIGHLY recommend grabbing the Convertible/Reversible Bag!


Tuesday, March 24, 2015

Little Kiwi's Closet Bow Back Beauty

So this new pattern is awesome... like totally and completely awesome.  I know I'm a sucker for Little Kiwi's patterns in general... but this one is just amazing... Yes, I tested it, but even bigger YES you need it.

The Bow Back Beauty From Little Kiwi's Closet is fantastic!


This pattern has a ton of options.. let me try to lay them out for you...
Sizes: NB - 12
Bodice options: natural waist, hip length, or onesie (NB-4)
Back options: Bow or plain (AND bow can be layered over plain for modesty or cold weather!)
Skirt options: Peplum, Dresss, High-low
Sleeve options: Sleeveless, Short Sleeve (with or without cuff) and long


This one is the hip length, with peplum and long sleeves.  For the fabric I used a reversible double knit from Joann's.

The binding was done in a nice ribbing that my local sewing shop carries...  Seriously, this store carries like 100 colors of ribbing and I have no idea why, but I love it.

Anyways.. I finished the peplum with a rolled hem and added a pretty crochet flower that I got from  Whimsical Fabric.


I love how elegant this combination looks.  I think the pink and black paired together makes a really darling combination, AND its perfect for cool spring weather in Washington when paired with our favorite Skinny Legs legging pattern.


In fact, she already wore it to school and got tons of compliments!


Next up I made my more "casual" version.  This is the short sleeved, natural waist, with a peplum and longer skirt underneath.  The skirt is the size 4 dress length, because I wanted a less dressy length than the dress version, and I think it worked out perfectly.

For this one I used a shirt to upcycle for the bodice, and did the skirt, peplum and binding in solid cotton lycras from PurpleSeamstress Fabric.  

The pattern specifically says to use good quality knits with nice stretch and recovery, like cotton-lycras.  I'd like to offer an apology for failing to listen to Lydia here... and here is why..  the t-shirt knit doesn't stretch nice like a cotton-lycra blend would, so it ended up a bit more fitted than the other two versions.  It still fits her, but if you're going to go with a less stretchy knit.. I suggest sizing up a little so you get more wear out of it.

And last is my favorite.  It's elegant, dressy, and still comfortable enough that she's picked it out to wear to school tomorrow... (granted its cold and rainy, so she's wearing a Bella Bolero over it, and leggings under).


This is the sleeveless, natural waist, dress version, with an overlay.  I cut the dress at the length written in the pattern and cut the overlay three inches shorter.

The main dress fabric is a stretch panne, and the overlay is in a stretch mesh with glitter embellished hearts.  The binding is a really nice poly-cotton-lycra ribbing.  I think she looks like a princess in this one.

What I love: If you couldn't tell, I really love all of the options this pattern gives, and the various ways to dress it up or down depending on options and fabric combinations.

What I'd change: So far as the pattern goes, the fit is fantastic, and the options are all clearly explained and easy to follow.  As for me, I need to write a note on my pieces to size up when using fabrics that aren't the pattern recommended ones!

So, hopefully you're still reading.. and if you haven't bought the pattern yet... here's the link again: Click Here!  Grab it while it's still on sale - its worth every cent for all of the awesome combinations you can make!


Tuesday, March 17, 2015

Bella Sunshine Designs Holiday Cutout Blog Tour: Day 2

Welcome to Day Three of the Bella Sunshine Designs Holiday Cutout Blog Tour!  And Happy Saint Patrick's Day!

Since it's St. Patty's Day, I decided to give you a look at the shamrock cutout version.  And here is our take on the Bella Sunshine Designs Holiday Cutout Top and Dress.

The details:
Sizes 12m - 10
Dress or Top Version
Instructions for Cutout or Applique
Includes 6 different shape printouts.


I did the dress version with both an applique and a cutout.  The cutouts come in three sizes and the pattern includes recommendations on which to use for different size kids.   I used the recommended medium sized cutout for Inara's, since she is a size 6 and I think the size is great on her.


I also added an applique to the skirt as well.  I wasn't sure if it was *too* much, but Inara insisted it was needed, so I went for it.  The pattern even includes instructions on how to applique the design on nicely.


I think what I love most about this pattern is that it is really easy to customize how you want.  Not even just with fabrics and cutouts, but you can make the skirt pieces wider for more fullness and twirl, or you can even do the skirt in knit if you wanted.  Or you can do what I did... FOE instead of the straps.  I was going to do the tie straps in green to pull it all together, but with tie straps, she wouldn't be able to wear it to school, so I decided to try something a little different and make the bodice binding and straps out of FOE, so that they would stretch to go on and off, but wouldn't be able to be untied!


We also decided to stick a shirt on under it since she wanted to keep it on all day and its a bit chilly here still...


What I love about it:  I love how it's so easy to customize... Have you seen some of the other bloggers on the tour (You can see the other two for today here!)?? There are all sorts of personal touches you can use with this pattern as a base.

What I would change:  The bodice is attached to the skirt so that you enclose the waist seam (yay!), but the way it's attached requires you to top-stitch that seam where I'd rather whip-stitch the lining closed, and forego the top-stitching.  But that's personal preference, isn't it?


Really though, the pattern is fantastic.  The fit was perfect without any adjustments, and the instructions are clear and easy to follow.  Here's an endorsement.. I actually tested the leggings and not the top, but bought the top when it was released because I really enjoyed the testing period and liked her writing style and the care she put into the fit and instructions.  There is even a free pattern in her shop if you want to check her out before buying!

While you're grabbing this great pattern, you should definitely grab the Bow Tie Leggings from the Bella Sunshine Designs Shop as well... I made them for Inara to go with this top... and the bows can be done in knit or woven, so they match the dress!!


Don't laugh too much at her shoes... she got them from a consignment sale and wears them ALL over the place.  As for the dress... we both love the look of it... feminine and well fitting, without being over the top.  It's perfect for my fickle child!

The code: BLOGTOUR will get you 20% off both patterns here, so grab them while they are on sale... then make sure to check out all the other awesome bloggers for the week!

Thanks for stopping by to check out my dress!

*disclaimer: this post includes affiliate links, but all opinions are my own!

Saturday, March 14, 2015

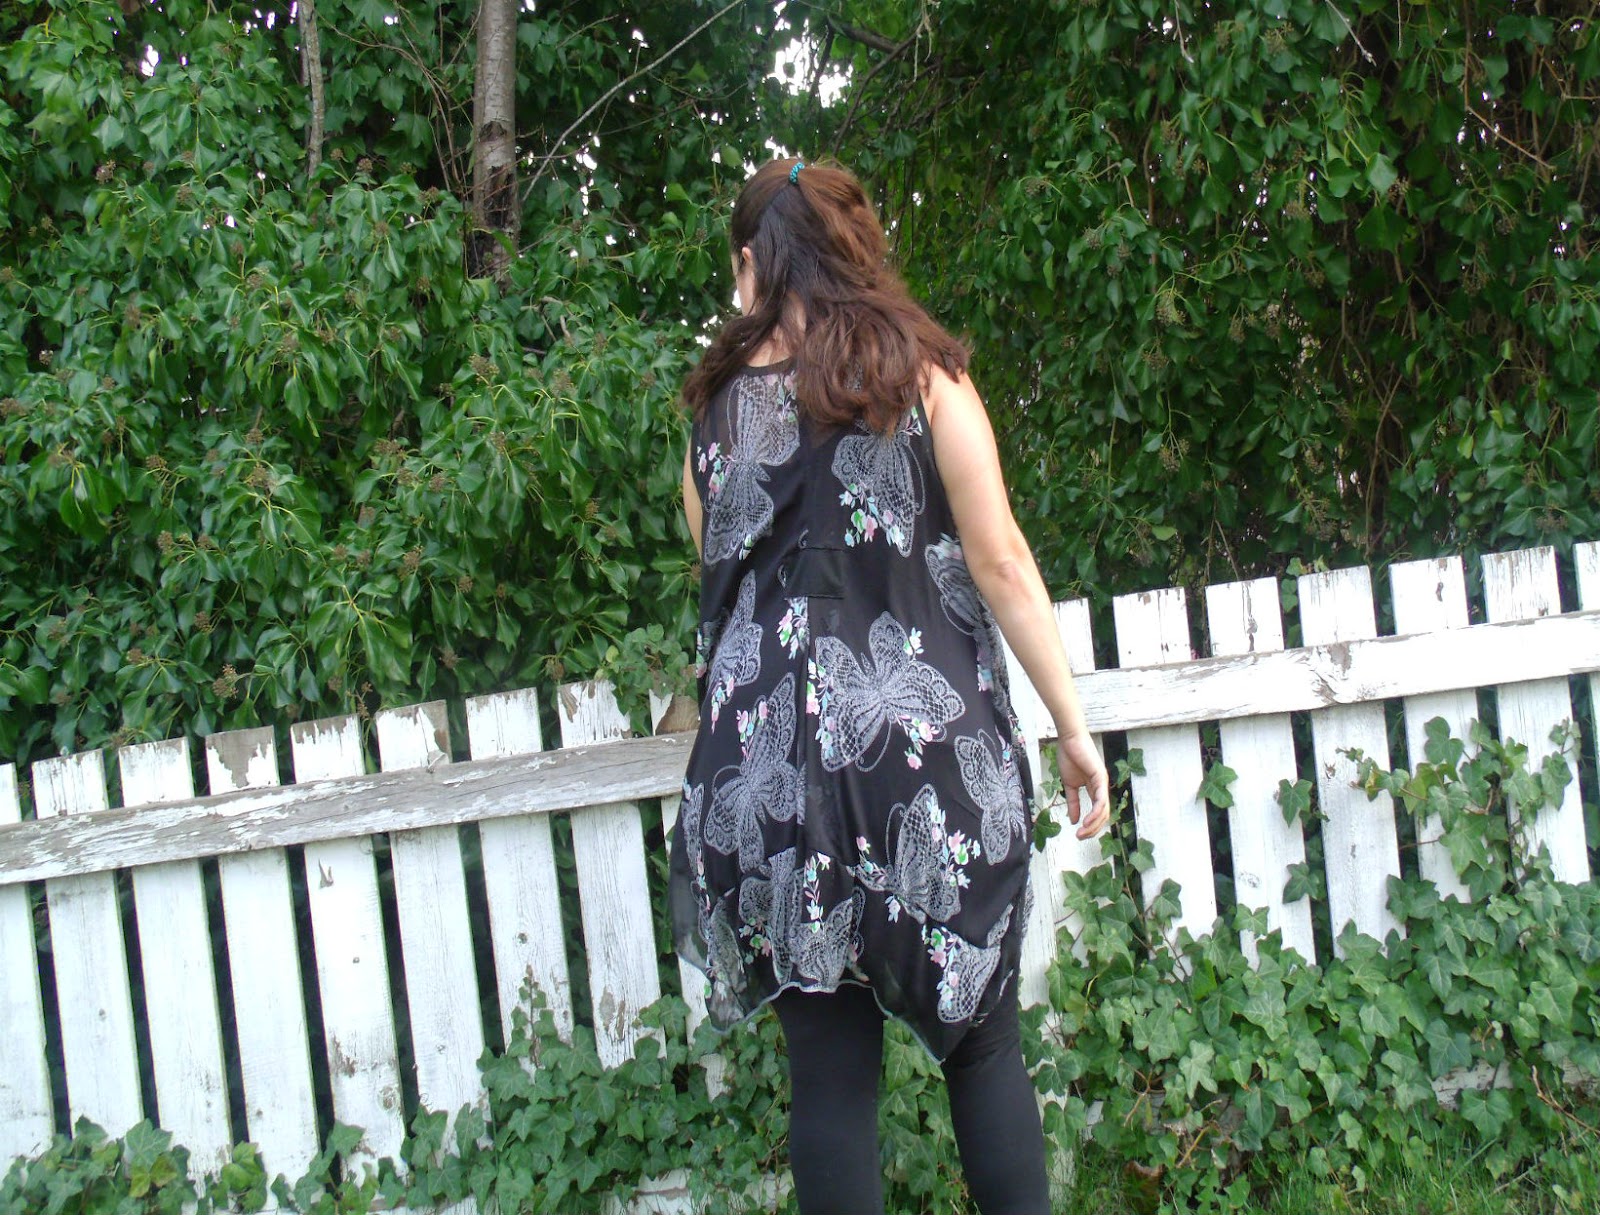
Pattern Review: Adeline Dress and Tunic from Boho Banjo

Well, I've been doing some sewing for me... so don't laugh at my awkward modeling... I even tried one of the poses that my photo editing software said was one of the most flattering poses for women...  I ended up looking rather awkward.  BUT I really liked this pattern, so awkward posing aside, I need to show it off.

This is my first time sewing for this designer, who is part of the Aspriring Designers' Challenge on Pattern Revolution.  Meet the Adeline Tunic from Boho Banjo Art To Wear.


I really enjoyed making this tunic, and I really like how flattering it ended up.  When I first saw the sketches I thought that maybe it wasn't going flatter my *wide* hips, but once its on, it flows and drapes so nicely I just love it.   The pattern fits a range of sizes - the large fits US sizes 14-24 (bust sizes 36-52.   The small fits US 6-10.  It also works in knit or woven fabrics, and I think you could get away with a combination of the two as well.  

This is the pose that my photo editor said to use... do I look weird?
The blue and black one is done in a cotton/rayon blend knit with the side panels done in a black interlock.  It's super comfortable and I'm actually wearing it tomorrow to see some friends from where I used to live.  The longest part of the pattern is cutting and taping the pieces... BUT *woohoo* the pattern comes with a print-shop option as well, so if you don't want to sit and cut and tape all the pages, just run it to the print shop!

What I love:  I really like how it fits... loose but still flattering and gives a nice shape line.  The instructions were easy to follow and well written, and are detailed for all the various options.

What I'd change:  I didn't consider the weight of my fabric on the knit one, so the weight of the fabric pulls it down a little in length.  Since I used  stripe, I didn't want to do the stripes horizontally, which would have alleviated my pull issue, but In the future I think I'll want to take 1" or so off the bodice before adding the skirt pieces.  


The one above is my woven version.  I this one in a chiffon print that I picked up specifically for this pattern and I just love how it looks.  It's light and flowy, and I just stuck a plain tank top underneath, and I think it will be perfect for the beach this summer as well.  The pattern has two options for binding the neck and arms as well, but I did knit binding on both of mine, as I wasn't sure I could battle chiffon on the bias to make the bias-bound option.  


All in all sewing time took about 2 hours, maybe a little less, as I was a bit paranoid about messing up the front pleat, so I kept rechecking my lines.  I really love how the pleat brings in the front area and then it spreads back out for the lower half... Creates a nice waistline illusion.


The back has the same figure flattering pleat as the front, which I do think works well even with a tush the size of mine.  The pattern uses illustrations along with detailed instructions on how to create your tunic (or dress... it has a dress length as well, but I made both of mine in the tunic length.  I think I want a dress length one for the summer though).


The pattern is available in the Boho Banjo shop and you should definitely grab this as an awesome wardrobe add on!  And make sure you take a moment to read more about the designer Pearl, on her Aspiring Designer Challenge Post on the Pattern Revolution Blog.  And check out some of the made to order dresses in her shop... she prints her own original artwork on them and they are so cool!

Thanks for checking out my post... and not giggling too hard at my attempts at modeling this fantastic new pattern!

Tuesday, March 10, 2015

Pattern Review: Love Notions Miss Mary Mack

I think this pattern is going to be a year round wardrobe staple here.  Lots of options, fast to sew, and really cute...

The Love Notions Miss Mary Mack Tunic is here.

The options:
Sizes 12mo - 14
Two bodice styles: curved and straight
Four sleeve options: gathered cap, short sleeve, flutter sleeve, and long sleeve (five if you combine the flutter and long which looks awesome)
Made for knits

This is Inara trying to look artistic while keeping the sun out of her eyes.  For this one the Fancy Nancy Fabric is a tight rib knit, and I did the bottom of the bodice in a stretch velvet to keep the "fancy" theme going.  The pants she's wearing are the Maxx-ine pants (also from Love Notions, and they have these crazy cute zippers on the sides)


Between sewing and cutting the pattern took less about 1 -1.5 hours to make.  The Short sleeves went a little quicker than than the long sleeve with flutter.  And on the purple one, I used clear elastic to gather, and that was much faster than using gathering threads like I did on the teal one.

What I loved: The flowy fit is great, without looking too wide on my slim kid.  And I love all the sleeve options - it makes it perfect for all year.

What I'd Change: I wish I had more clear elastic to gather the second top that same way.  It makes the knit gathers look so nice and even and I don't have to mess with gathering threads AND it stabilizes the seam.


Since Inara won't wear jeans, we have a rule that if she wears leggings to school her tush needs to be covered. So shirts like this are awesome, because they are long enough to cover her tush with leggings without having to add a skirt.  The shirt is great for highlighting prints and you could even fancy it up with a lace overlay on the skirt part.


Here's my best endorsement too... The teal fabric is from Peru.  My parents brought me back a meter from their last trip and I can't get anymore until they go again.... This fabric has sat on my shelf getting picked up and put back for a year... and I cut into it for this pattern because I love it and Inara loved the pattern and the fabric!

So... its on sale through Saturday and is available here.   I totally recommend getting the Maxx-ine pants and skirt to go with it if you don't have that pattern yet!

**Note: links to Love Notions site are using my affiliate link, but all opinions are totally my own! If I didn't love it, I wouldn't promote it!


Tuesday, March 3, 2015

Pattern Review: Sweet Slumber Pajamas from Monkeysbug Patterns

We live in a kind of weird climate.  To one side I have the ocean and Canada and to the other we have mountains.  It results in a pretty temperate climate, but at this time of year we go from 30s and raining to 60s and sunny on a daily basis.

This means its time for some summer PJs for those warmer nights... and this is the perfect pattern for it...  The Monkeysbug Patterns Sweet Slumber PJs and Nightgown.

The details:
Sizes 2 - 14
Tank top style top and nightgown
Two short lengths: clam digger and shorty shorts
Made for knits


These have both gone through the wash multiple times since wearing, and Inara totally loves them.  The fit is fantastic, and the gathered front of the tank gives these a really feminine look without making them too baggy.

What I love:  If you've never made a Monkeysbug pattern - there is no trimming the pattern pieces, you just lay the pages next to each other and tape (yay!! No trimming!).  I really love how the straps and bodice trim are made - there is elastic in the trim so you can use pretty much any knit and not have to worry about them stretching out and losing their shape over time.


What I'd change: I actually didn't change anything on the pattern when I tested, and the fit was pretty fantastic I think.  On my nightgown, though, I decided to try clear elastic instead of regular 1/4" elastic, and I did find the clear elastic was a little easier to sew through the trim/straps on the last step since it is a little thinner (though it took way more clips for the first step of sewing it in since it slips more!)
For my nightgown I used a really pretty pink and brown poly cotton blend knit (I think it's actually pajama knit) that I won playing games in a sewing group.  For the straps and trim I used a dark brown interlock.  Normally, I wouldn't use interlock for straps because it stretches out and loses shape over time, but with the elastic added in the strap pieces it will hold its shape awesomely.  This knit was kind of thin so I used hem tape to stabilize the hem before stitching it (great recommendation Kate put in the pattern!)


For the PJ set I used a pretty cotton-lycra rose print from NR Fabrics and the solid is the lilac cotton-lycra from Purple Seamstress.  I used the rose print for the waistband of the shorts too, so they'd coordinate nicely.    She's not actually sleeping, but she pretends well, right??


I had a terrible time trying to get a good picture where the pretty gathers show, so here is our silly outtake pic... which also shows how nicely the straps cover without sitting too high under the arm too.

I have to say, there will be many more of these made. I know they are PJs, but I think the tank and shorts will be perfect for summers at the beach here as well.

The pattern is on sale for $5.95 today only, so run over to the Monkeysbug Pattern Shop and grab it!